

Joe S. on the After Effects List pointed out a Macworld article that neatly summarizes all the free and commercial font sites, plus links to font resources. Confirms my theory that DaFont is the first (and often only) place to go for typographic styles and inspiration.
Monday, July 16, 2007
Monday, July 09, 2007
Imagining AE v10
You've all probably seen the Microsoft 'Surface' demos floating around for the last little while, but a friend sent me this link that shows the system and it's workings with a bit more depth.
Now granted, this technology is- for the near future- aimed at the kiosk and POP crowd, but imagine (if you will) an environment where we can do 'our thing'... truly gestural "live" compositing, animation and presentation. I was particularly taken with the fellow working with the map at 1:35.
How might this affect our industry in the future? One might argue that in this day and age compositors and motion graphics folks create 'passive' media, owing primarily to the bandwidth and rendering requirements of our visuals. We create and publish, someone sits down and watches it.
It can, of course, be taken further: DVD authoring allows for a certain degree of interactivity, Flash offers a lot, and (ignoring immersive gaming worlds) you can find rudimentary interaction with pixel-based imagery using software such as Cult 3d. But unless you have some fancy widget like a wacom tablet, the 'gestural' interactivity (even in games) is pretty limited.
My work is very 'linear' right now. I create a show opening, it plays, the show starts and there ya go. But why should WE be the arbiters of what, when and how the viewer sees our work? I can envision a future when immersive environments (like that offered up by 'Surface') allow me to move beyond the temporal limitations of what I do and open my work up to direct interaction and exploration. The lines separating 'true' worlds like 3d games and 'my' business of motion graphics will blur, and the art of a "show opening" will certainly evolve. But it can really only be done with a hand (or two, or more) and 'Surface' is a "first" tentative step in that direction.
Thursday, May 31, 2007
Max2AE

I've posted before about Boomerlabs' Max2AE plugin that integrates 3dsMax cameras, lights and layers with After Effects, but they've since released the 2.0 version and it certainly warrants another close look.
This particular post takes you through the creation of an entire project, from modelling in 3dsMax to ray traced materials, rendering issues to After Effects, and how to make it all work together. Click here to view the tutorial.
One thing: I do not have the final rendered movie to refer to (I mention it in the tutorial), but you can instead see elements of this look in my demo reel.
New to this release of Max2AE is the ability to go from After Effects to Max. This capability is something new and quite exciting: to the best of my knowledge, this is the ONLY way that you can take your AE worldspace and export it TO a 3d application if you decide that you want to add some extruded elements to an existing AE project. I'm still playing around with this capability and I don't touch upon it in this particular post, but keep your eyes pointed this way for a tut covering AE2Max one day soon.
UPDATE:
Matthew from Boomerlabs sent me a note pointing out a few changes to my tut:
1) Timestamp 22:13. You no longer need to create a layer to export a camera or use MAX2AE. MAX2AE is also available in the Utility Panel.
2) Timestamp 28:08. Maintain heirarchy will keep the existing object hierarchy when you export. If you turn this off, all objects _will_ properly move relative to each other and the world. However, their hierarchy is not maintained. For most users, keeping it on or off is no big deal. However, if you are only exporting _individual_ layers that aren't already arranged in the proper hierarchy in AE, it is best to turn this option OFF otherwise you will be importing motion that is relative to a parent that doesn't exist.
Wednesday, May 16, 2007
On Saving

Ok, we all know how to 'save' a project. File-> Save. Some people even know a tricky little keyboard shortcut that impresses clients and girl/boyfriends: Ctrl+'S' on the PC, or Apple+'S' on the Mac. But every now and again someone posts an urgent request on a mailing list or a forum- usually using a lot of capital leters- asking for "HELP! CAN'T OPEN MY AFTER EFFECTS PROJECT!! DEADLINE!!! URGENT!!!!"
Now I love After Effects. It's my number one tool, I use it every day, all day, it puts food in my family's stomach and it's paying the bank that owns my house. But it's also not perfect. Every now and again, weird things happen and if you've drawn the short karma stick that particular day, you might end up with a corrupted project. And a corrupted AE project often means that it can't be opened. At all. Ugh time.
There are a few little tricks you can try. First off, quit AE and re-start. If that doesn't work, shut down your entire computer and re-start. If that doesn't work, shut down your computer and your network/router and re-start. At this point, if it's not opening, re-start After Effects again, and instead of opening the project, 'Import' it into a blank AE project, which oddly often works wonders. If that doesn't work, shut down AE and try removing the Open GL plugin from your 'plugins' folder: this is (sadly) often the purveyor of much woe. Then try removing ALL of the (non-standard) plugins from your plugin folder. Moving on, if you were using an older version of After Effects (say, v.7), then try opening it in v.CS3 if you have access. Don't have the most recent version? Download the trial from Adobe.com: it works for 30 days. But note that you can't open AE projects in EARLIER versions of the software at all. At this point, if things are still not opening, try gnashing your teeth, waving wands over your monitors and burning incense. Then come back to this point, re-read the following words and follow this advice on your NEXT project...
Increment And Save.
Say it again. Then do it.
Look closely under your 'File' menu and you'll see a little item called, oddly, 'Increment and Save'. Never selected it? Try it and see what happens. If you have a project named, say, "Opening.aep", it'll save it without opening a 'save-as dialog box', and automatically append a number to it, in this case, "Opening 1.aep". Select it again and it'll become 'Opening 2.aep'. And on and on. You'll never save over a previous version of a project. Now, the question is, why? Let me tell you a little story...
I was called in to work in a shop to modify a project that one of their freelancers had originally produced. I sat down, asked where the project was and they showed me the directory. And there it was: something called "Network Package.aep". One project. I opened it up and discovered that it had comps for many show openings, backgrounds, lower 3rds, intersticials, segment spots, promos transitions... and on and on and on. There was ONE After Effects project, containing EVERYTHING for the look for an entire network. And no backup. Well, I admit that I shuddered. If this project were to get corrupted, or accidentally deleted, or saved over after it got 'reduced', or... or... well, you get the idea.
First thing I did was type Ctrl+Alt+Shift+"S". And there was "Network Package 2.aep". I breathed a little easier then. Now I certainly would NOT recommend putting so many elements together in a single AE project, and certainly not having a single version of the project file. That's a disaster waiting- nay, Begging!- to happen.
So, that's the AE keyboard shortcut. You'll find it in the "File" menu too. I use it on every project I'm working on. When? Well, that depends. Usually 'when I remember', and always when I realize that if a project were to get lost/deleted/corrupted then I'd cry like a baby. I often do the keyboard shortcut when I know a client is watching me so they can see how cool it is: so many fingers, pushing so many things at once... it's like that teensy blue power light on really expensive speakers: very impressive and professional looking, but in a confident and understated way.
Yes, you'll end up with a lot of versions, but think of it as "a lot of insurance" instead. Almost free insurance. Yes, it'll take up space on your drive, but you can always buy a new drive. Getting back hours/ days/ weeks of your life is a little more expensive.
Now if you're using AE7 or later, you'll see that there is an option in Preferences to "Auto-Save" (turned off by default). I personally never use it, mostly because "you never know". Like if you do 'reduce' a project, then you may lose the rest of the project next time you open it. I like to control when, where and what I save.
That should control any damage if you should ever find your project corrupted, plus it's just smart production practice. After all, you just never know. If need be, you can go back to the earlier version, and lose minutes or hours of your life at most.
Thursday, May 10, 2007
Zaxwerks Layer Tools In Production

Working in 3d space in After Effects can be a tricky business at best, and downright confounding at worst. I recently completed a project for a client and dealt with a couple of these issues in a quick, streamlined way using a new 'plugin' from Zaxwerks called "Layer Tools".
At issue was how one can quickly distribute layers in 3d z-space such that there wasn't any 'ringing' when two intersecting layers fight for the same worldspace. Kind of a 'Layer Smackdown', one might say. I also talk about how "Layer Tools" gives you creative options that were previously achievable only through persistence and much time away from family and friends.
Take a look at the finished animation here (11 megs, h.264, 1:20). Then take a look at this tutorial which describes how I used "Layer Tools" to overcome a couple of technical and creative hurdles.
Tuesday, May 08, 2007
Ira Glass on Getting Started
A client sent me a link to this inspirational post. If you want to view all four episodes, check them out here.
Monday, May 07, 2007
Animating 3d Pie Charts

If you spend any time working the corporate graphics side of the biz, it's only a matter of time before someone wants you to show data in an interesting manner. Bring on the pie charts!
It's a bit of a mind-bender how to even create a pie chart in After Effects, though, unless you're lucky enough to own a copy of Digital Anarchy's 'Data Animator' plugin package. So for those of us struggling without, here is one (well, three, actually) ways to make that data look great.
Each stage steps up the 'quality' quotient. The first part describes how to create a simple, flat, animating pie chart using no third party effects. If you're happy with it, then you're done! But if you want to up the production value a bit, the next section covers how you can use Zaxwerks Invigorator to extrude the chart, giving it depth. Finally, the third part shows you how you can use Zaxwerks' new Layer Warp plugin to bring the data on (and off) in an interesting manner.
Here is a link to the 'finished' clip, showing what you will be able to accomplish (QT, Pjpeg, 7 sec., 3.5 megs). Then take a look at this tutorial explaining how to do it (QT, h264, 26:25, 26 megs). Finally, you can download the project file here (AE v7, Zaxwerks Invigorator v4 (optional), Zaxwerks Layer Warp v1 (optional), 25 kb)
Monday, April 16, 2007
Zaxwerks Releases Layer/Grid Warp

AE CS3 Beta, Discussion and Help
![]()
You can now help build After effects by downloading and participating in the After Effects (and Premiere Pro) beta program. Go here to download the application(s).
As a long-time beta tester for various applications, I should point out that you might want to 'play' with them a bit before you start using them in a production environment. Remember: these are 'Beta' programs, which means that there are bugs to be found and squashed! You could also go to the official discussion forums and see what people are saying, and whether there is a general consensus with regards to the overall stability of the application.
Along those lines, remember that (as with all After Effects program files) you can't go 'back': any project that you create in CS3 can NOT be opened in AE7 or earlier!
And once you've got it installed, visit the online help (this link is for After Effects) to view all the new features.
Tuesday, April 10, 2007
Reels Resource
I get my inspiration from a lot of places, but when I'm stuck and need some motion graphics mojo to pay me a visit, my first stop is always the reels forum at mograph.net. There you'll find links to the industry powerhouses, as well as some tasty and obscure artists that the forum members have dug up.
Monday, April 02, 2007
Take Me Out to the Ball Game... again and again and again...

The Toronto Blue Jays played their first game of the season today (5-3 Jays! Whoo!), and I created the graphics package for "Your World This Week", a weekly update show on Rogers. Here's what the player intro looks like... one of 43! (Quicktime, h.264, 3.2 megs)
This brings up workflow questions. How should one organize all the various and sundry elements so that the package can be assembled quickly, accurately and effectively? There are a ton of little time-saving tips 'n tricks that you can employ, and this video here will walk you through some of the issues that you may confront in the course of the production of a multi-item package.
3d and Adobe
Whoa! Two posts in one day! Someone slow me down!
Upon finishing my previous post covering Zaxwerks' upcoming warp plugin for After Effects, I got to thinking about Adobe and 3d applications. The gist of it is this: Adobe has applications that create content for pretty much every conceivable medium, but they do not have a 3d application (After Effects notwithstanding, and Dimensions RIP). Why might this be, I wonder?
If you're a user of the Adobe Creative Suite, you've probably taken advantage of the very powerful opportunities offered by Dynamic Linking... You can create a clip in After Effects and have it linked directly to a Premiere Pro video project. Change the AE project, and it's updated in PPro. Oh, that I could have this capability between After Effects and a 3d application!
Granted, there are ways to see that the twain shall meet: Maxon Cinema 4d seems to be makingC4d/AE interoperability a priority and the most recent Max2AE release from Boomerlabs takes it even further, allowing you to go from After Effects to 3dsMax, and back again if you wish (I'll be covering this capability in a blog entry very soon). You've got 3d file formats such as RLA/RPF that contains 3d data that After Effects can (usually imperfectly) use to match up world spaces, and you can import Maya camera data in After Effects.
Is it a case of there not being a suitable 'mature' application on the market, ready to be purchased and brought into the Adobe fold? Why does Autodesk have not one, but TWO 3d apps (3dsMax and Maya)? Is Adobe waiting for Apple to create/buy an application before they decide to play catch-up? Or perhaps Google is threatening to make it all moot by releasing a web-based application as good or better than all the others?
3d Warp & Distort in After Effects

After Effects is often referred to as being a "2.5 d" program. The reasoning behind this is because the application has had a 3d workspace since AE5, but all AE layers are 'flat', like little pieces of paper floating in space. To be specific, the native application hasn't been able to extrude or deform in the 3d worldspace.
Enter Zaxwerks, one of my favourite plugin companies. Many of you are already aware of 3d Invigorator and ProAnimator from Zaxwerks, both of which effectively address the "extrusion" limitations inherent to After Effects. And now (or rather, 'soon'), you'll be able to "deform" in AE, too. Still in beta, I've had the opportunity to play around with two new plugins soon to be released by Zaxwerks, "3d Layer Warp" and "3d Grid Warp".
Now a few of you old-timers might remember a plugin for After Effects called "Freeform". It's kind of hard to determine whether it's still a viable product, but posts on the COW Freeform board seem to suggest that it does work in AE7 and is still being sold. Zaxwerks takes the concept of warping in After Effects much further.
Click HERE for a Quicktime tutorial offering a look at the basics of Layer Warp and Grid Warp.
The pluses are pretty obvious: Warp and distort directly in After Effects. Use comp cameras & lights. Use precomps as your warp sources. I've identified two areas that will hopefully be addressed soon: 1) Intersections with AE 3d space. I'm anticipating that this is not an intractable issue, and that eventually a workaround can be developed. The fact that it is possible to create third party renderers offers some hope. 2) Sliders, sliders and more sliders! The GUI elements available to plugin developers are pretty slim, so you either have to use 'em as-is, or develop your own external GUI (like Zaxwerks did for Invigorator/ ProAnimator). I'm hoping that future releases of 3d Layer Warp will include some sort of gestural/ interactive warping capabilites, much like Freeform's control points and tangents offered.
I had the chance to use Layer Warp in this project a little while ago, and one sharp-eyed reader sent me a note asking, "how did you manage to warp the photos"? Now you all know :)
Thursday, January 11, 2007
The Package
 I got an email from a student the other day with the subject line, "How to Make A Demo Reel?". It's certainly a valid question, repeated ad nauseum in forums the world over, because the demo reel is seen as the essential calling card in our industry. My answer, as always, was... "Only put your best stuff in it. Keep it short (less than 2 minutes)." That's really about all there is to it!
I then thought a little bit more about her intention. If one is putting together a demo reel, then obviously one is in the process of seeking employment, whether it's full-time or on a freelance basis. And if that's what you're after, a good demo reel isn't all you need. You need A Package.
When you're hunting for the gigs, you'll need all of the following at a minumum: A demo reel (DVD and online versions), business cards, letterhead (with at least a cover letter template and resumé), and a website. And here's the key: You're a creative person in a creative industry, so it ALL has to look good!
So design a logo. Author your DVD Reel. Make a website. Create your letterhead and have a printing house print your business cards (avoid doing it yourself on your inkjet!), and do it all with flair and style. Package the hard-copy stuff in attention-getting folders so you'll go to the top of the pile. Use the same look consistently across all media. I noticed an online ad for an available position, and the employer had written that "... any DVD's submitted with your name written on it using a sharpie will be thrown out". So drop $149 on an HP, Canon or Epson that prints directly onto inkjet-printable DVD's. The image at the top of this post shows the 'hard copy package' that I might drop off to clients, including cover letter, resumé, business card and DVD with reel. You might want to travel lightly, though, and so here's the 'Standalone' DVD reel with business card in a simple, catchy clamshell case. Contact your local consumables dealer to see what interesting case options they offer, and avoid the easily-breakable jewel cases like the plague!
 Create some letterhead and use it on all correspondence, including your cover letter, resumé and, perhaps, a 'testimonials' sheet. I'd personally suggest designing it in a page layout app such as Quark or Indesign so that you can export as a PDF when applying for jobs electronically. Why? Because everyone has Adobe Acrobat Reader installed, but not everyone has MS Word.
 And finally, tie it all together with your website. Keep the look consistent across all media, make it look great, and you're sure to get that second glance that puts you before all others.
Monday, January 08, 2007
My Favourite Expressions

IMPORTANT: READ THIS FIRST!
Blogger doesn't seem to allow for really long, uninterrupted lines of text (ie. long expressions), so you'll find that the code below is 'cut off'. When copying the code, make sure you begin the selection at the start of the expression (first line) and drag to select everything to the end of the last line: all will then be copied. What I'm saying is, don't copy single lines: you might miss something!
Expressions are a powerful but rarely used toolset that can drastically simplify animating in After Effects. Based upon the Javascript programming language, I suspect that 'artists' tend to shy away from anything resembling the BASIC that many of us were forced to learn way back in the dark high school days of DOS, but I think you'll find it's worth it to dig a bit deeper and figure out the rudiments of expressions.
I, personally, feel that I have a moderate understanding of expressions. I use the 'pickwhip' a lot in After Effects to link parameters for layers together (general rule of thumb: if you ever copy and paste keyframes, use expressions instead) and can whip something up from scratch if need be. That said, I can't claim intellectual ownership of the two expressions that I use the most, because the math was a tad bit beyond me. Read on, however, to see how you can use these expressions in a real-world project.
The first expression we're going to look at allows you to make an After Effects layer in a 3d composition 'one-sided'. The idea is this: if you have a layer facing the camera, you'll see it. But once the camera moves 'behind' the layer, instead of seeing the same layer but backwards, it'll disappear. This one was written by Michael Natkin of Adobe and is applied to the 'opacity' parameter of a 3d-enabled layer layer in a composition with a camera...
a = toWorldVec([0,0,1]);
b = thisComp.activeCamera.position - toWorld(anchorPoint);
c = dot(a,b)/length(b);
if (c > 0) 0 else value
Orbit the camera around the layer and you'll see it appear and disappear.
The second expression is a 'bouncy' effect that is applied to the scale parameter of any layer (doesn't have to be 3d), and was created by everyone's favourite polymath and all-round helpful guy, Dan Ebberts. You can modify the final size, duration and 'stickiness' of the bounce by altering the variables in the expression, and the only caveat to this one is that you can't tell it when to start: it always begins at 0:00, so some pre-composing might be necessary to use it in your composition.
(NOTE: see tip at top of post regarding copying/pasting this expression)
final_scale=100;
bounce_duration=3; //lower number is longer
bounce_speed=10; //lower number is slower
x=final_scale*(1-Math.exp(-bounce_duration*time)*Math.cos(bounce_speed*time));
[x,x]
So, there's some neat-o math for you, but how might it be used in a real-world production environment? I had a recent project that called for a 'light, hip, kinetic' look, and I ended up using both of these expressions a great deal to both lend visual appeal to the piece and to drastically simplify the project design and workflow. Take a look at the finished animation here, and then to get a visual overview of both the expressions and how they were used in the project, take a look at this video tutorial overview.
UPDATE: Regarding the necessity to pre-compose the 'bouncy' expression, Kasper sent me this note:
Hey there...
i was just watching your tutorial with the "bouncy" expression and one of the guys here at work did a little addon to the expression so that your layer don't have to be at 0:00:00 so no more pre-composing. here is the expression:
(NOTE: see tip at top of post regarding copying/pasting this expression)
final_scale=100;
bounce_duration=3; //lower number is longer
bounce_speed=10; //lower number is slower
x=final_scale*(1-Math.exp(-bounce_duration*(time-inPoint))*Math.cos(bounce_speed*(time-inPoint)));
[x,x]
Hope that it is useful (ed. note: sure is!)
UPDATE #2: Kasper is one clever fellow... read on and see how he and his colleagues have taken away the need to set the final scale in the expression...
(ed. note: it might not be apparent that this actually works. If you're at the start of the layer with the expression applied, the scale parameter will say "0". If you click and drag on the scale number, you can change the scale but when you release the mouse button it reverts to "0" again. No fear: it'll scale to the size you indicated when you actually run the expression.)
(NOTE: see tip at top of post regarding copying/pasting this expression)
bounce_duration=3; //lower number is longer
bounce_speed=10; //lower number is slower
x=value[0]*(1-Math.exp(-bounce_duration*(time-inPoint))*Math.cos(bounce_speed*(time-inPoint)));
[x,x]
Hope that it is useful (ed. note: sure is!)
UPDATE #2: Kasper is one clever fellow... read on and see how he and his colleagues have taken away the need to set the final scale in the expression...
So we updated the "bouncy" expression again. It was becoming a problem that you couldn't keyframe the scale of the layer because "final scale" was set in the expression. So you always had to use a null to keyframe the scale if you wanted to do some more scaling to the layer. But my buddy here at work updated the expression so that the scale is no longer defined within the expression. You now just set the scale as always within the "transform" properties. So that way you can now keyframe the scale.
(ed. note: it might not be apparent that this actually works. If you're at the start of the layer with the expression applied, the scale parameter will say "0". If you click and drag on the scale number, you can change the scale but when you release the mouse button it reverts to "0" again. No fear: it'll scale to the size you indicated when you actually run the expression.)
Here is the updated expression:
(NOTE: see tip at top of post regarding copying/pasting this expression)
bounce_duration=3; //lower number is longer
bounce_speed=10; //lower number is slower
x=value[0]*(1-Math.exp(-bounce_duration*(time-inPoint))*Math.cos(bounce_speed*(time-inPoint)));
[x,x]
Wednesday, November 01, 2006
The Best After Effects Error Yet, plus Bug Reporting!
I was opening an old project and was greeted by After Effects promptly crashing. It was a reproducible crash linked to a beta copy of a plugin having expired, but the After Effects error message was what caught my eye... "After Effects error: strange situation [0/2]. (26::84)". Strange indeed!
Software always has issues, some more critical than others. And in a perfect world, developers would like users to report these bugs, errors and crashes so that they can be reproduced, tracked down and fixed. And it's not just the spectacular, data-losing, days-of-work-disappearing crashes that coders want to hear about: quite often, it's the little things that might point the way to bigger issues. Some bugs are particularly difficult to squash because they can't be reliably reproduced, and the more reports there are, the more opportunities there are to fix it. Even the most mundane step can lead to a breakthrough.
So, report your bugs, big and small! For After Effects, send a note to aebugs@adobe.com. All bugs, big and small, go into a database that ultimately helps make the application (and our lives!) better.
Friday, October 27, 2006
Where To Get The Gigs
You've worked hard, learned plenty, and now you're hanging out your shingle as a motion graphics artist. The question is, where will you practice and how do you get the gigs? There are many avenues of approach with regards to employment in the field, and it's pretty important that you take the time to determine what would suit you and your lifestyle best before you start looking. In a nutshell, you could seek... 1) Full-time, salaried 2) Full-time, contract 3) Part-time, contract 4) Freelance.
As a salary wo/man, you'll have a steady gig with predictable income, health benefits, technology budgets, technical support, retirement plans and, if you're lucky, a games room with a ping pong table. The downside is that you'll be working a daily grind. If it's a good, challenging, rewarding grind then you're doing well, but if it's not, you'll find yourself bound by the 'golden handcuffs'.
Full time contract usually offers a bit more flexibility time-wise, possibly at the expense of health benefits and guaranteed employment. Be prepared to bounce from gig to gig at a rapid pace. This is a great approach for beginners, as you'll get exposed to many different visual strategies and approaches and make lots of contacts for possible future freelance work. Befriend the producers, do good work, and it'll pay dividends in the future.
Part-time contract and freelance often work hand-in-hand: it's nice to have a steady contract (say, a day or two a week) to 'smooth out' the cyclical nature of freelancing. And while freelancing offers the most freedom, it takes a long time to establish yourself with the clients who will pay you what you're worth, and keep coming back for more. You're also never done working: it's a tricky balancing act, and you must remember that when you're pulling 18 hour days on a project, you also have to be concurrently seeking out your next gig. And don't forget that if you're freelancing, you have to build in the cost of software purchase/upgrades, hardware, office supplies, internet and telephone, desks, and chairs, and space for your office. It all adds up, and it can be easy to miss the forest for the trees if you're not careful. Most importantly, make sure that you get a good accountant right off the bat, as there are many financial incentives and opportunities to be had when you work for yourself.
So, with all that in mind, here are some links to job resources on the web. You'll find that some are more regional than others, and I would invite you to send in your own links ("alan" +followed by the 'at' symbol+ "effektor" =then 'dot'= "ca")that I will add as they arrive.
Motionographer (great for the high-end gigs, largely but not exclusively American, often NY/LA.)
Playback Mag (mostly Canadian listings, and not just motion graphics)
Mograph Jobs board (International, tending towards America)
Media Job Search Canada (Canadian, obviously. Not just MG gigs.)
DesignInMotion / 2-Pop Job Forum (International, tending towards America)
MGLA: Jobs (Los Angeles/ SoCal)
MGLA: Jobs Wanted (Post YOUR talents here- Los Angeles, SoCal)
Mandy.com (Global, OK posting propagation depending on your region. Many Low/No pay jobs for students and beginners)
xplsv.tv (USA generally, not many posts yet but seems to be improving)
Thursday, October 19, 2006
Giving Flat Stuff Depth, plus... Awards!

This was a tricky sort of a project. The client came to me and said, "We've got a new building that some of our employees will be moving to, and we need a video to get them jazzed about the facility". The only creative that I would have to work with would be a bunch of still photos. What to do! It would be easy enough to drop them on a timeline with some pan-and-scan and music, but it called for something with a bit more visual dynamism. I decided to use the 'ole "Simulated 3d" look.
Update: This technique is also referred to as the "Ken Burns" (or maybe it's Ben Kurns) effect. Once you've probed my page, do check out another 'how to' at Bob Donlon's excellent blog.
Further Update: A debate broke out on the After Effects list that this is not, in fact, the 'Ken Burns' effect. Decide for yourself at the wikipedia article discussing it. One might argue, though, that this technique needs a name, and so I might humbly suggest calling it the "Alan Shisko Effect" :)
The premise is simple: using photoshop, cut elements out of a picture so that you have (at a minimum) foreground, mid-ground and background layers. Bring it in to After Effects, distribute the layers in a 3d composition along the Z axis (the back and forth dimension) with some scaling applied to match everything up visually, then make a little camera move. If done carefully, you'll end up with an effect that looks as though you made the shot in the actual building with a dolly or track.
Take a look at the video (Quicktime, 22mb, 2:30) to see the final result, then watch this clip (Quicktime, 9.5mb, 11 minutes) to see an overview of the technique in production.
It wasn't just the client that was happy with the end results: the piece garnered a Gold at the 2006 Promax/BDA awards in New York this past spring! Whoo hoo! And that was on top of a silver awarded earlier in the same ceremony!
Saturday, September 16, 2006
How To Be A Motion Graphics Artist
Pardon the blog-rot... the past short while has been an exceptionally busy time.
I'm taking a short break from creating 'tutorials', and so this time 'round, I'd like to address the question of "how to get started" in this biz (that is, motion graphics). I often get emails (and even phone calls) from people who are looking for a leg up. They've done a bit of research, seen some reels, know what they'd like to accomplish and are interested in getting started. But they haven't a clue where to begin. It's a very tricky question to address, and I think it'd be best to begin with my story.
If you want to skip the verbose back story, just pop down to the last paragraph or two.
I've always been a visual person. I've also got what I consider to be a strong sense of depth, space and geometry. When sitting around, for some reason I often find myself finding all of the angles in the room (like the ceiling, or a banister or some such thing) and continue the lines to visualize where they might intersect, and how it might look. I bring this up first, because I believe that folks either do or don't have an aptitude for certain things. That said, it is certainly possible to achieve anything through sheer perseverence, but in my life, I like to pursue things that are 'easy' and that don't drive me into the ground. I COULD become a good gardener, for instance, but generations of plants would suffer. So, take a look at motion graphics and ask yourself if you CAN do it, not just whether you WANT to do it. Do you 'live' in a visual world?
As a youngster, I had an innate desire to create imagery. I designed my very first logo for my rock band ("Cast Iron")when I was 13 using letraset and black markers: honestly, I think it still looks good (image at the bottom), even if it does read as "Last Prom"! I bought my first still camera (a Nikon FG) in Grade 12 and still remember the magic of seeing that very first black and white image appear in the chemical muck. It was truly a revelation, and one which stays with me to this day. This led to my considering my post-secondary school options. Having dropped Calculus in Gr. 13, architecture (another of my loves) was out, as was a career in medicine (bit of a flight of fancy, that). One night, I happened to overhear a friend talking about his plans to attend the Film program at York University here in Toronto. It clicked: Film! That's exactly what I wanted to do, but hadn't given it a thought- I figured that the only place you could 'learn' filmmaking was in California! I applied, was accepted and off I went.
And now to the question of schooling, and it's value in an artistic career. I graduated with an honours BFA in Film Production in 1991. In retrospect, I'd say that my five years in University was "OK". It certainly gave me an opportunity to experiment to a certain degree, but that said you can only experiment so much when you've got a $30,000 production budget (with your parents as 'executive producers'), a very small crew (some of whom were dependable, while some weren't) and not much of a clue what you're doing technically. I dreamt of being a cimematographer. I could load a mag in total darkness in no time, and I read the ASC manual before going to sleep. Oh, and mistakes: I could (and did) make lots and lots of mistakes in school. What I found I truly lacked, though, was a compulsive, burning desire to make movies. I discovered that the whole filmic process was too gargantuan for me to contemplate. I felt a strong desire to 'downsize', to find something that I could do on my own.
I went back to photography. I can't overemphasize the value of having a great teacher. Everybody has had their favourite teachers, and at York, mine was a fellow named Jack Dale. I took several photography classes with him and he, more than anyone else, fired up what I call my 'visuality'. I had truly found my calling. Upon graduation, I hung out my shingle as a freelance photographer, specializing in portraiture and photography for the arts (dance and theatre companies, for the most part). The early nineties, however, were a pretty slim time in my neck of the woods. Gigs were few and far between. I assisted with Renzo, an established pro photographer, and even he was having a very hard time making a go of it. The day finally came when my brother said that he had a better offer, and wanted to know if I'd be interested in taking over his position as in-house video producer for a large explosives corporation. I remember the day I resolved to make the change. I truly thought I was turning my back on my dream (photography) and my life (starving artist).
At ICI, I was a one man operation. I wrote, shot and edited all manner of corporate vids. I was working with an ancient, tape-based a/b roll editing system. A couple of years in, though, the department picked up an Avid MCXpress NLE system. Shooting and editing became infinitely easier and more flexible. Pretty much overlooked in the purchase was the inclusion of an inexpensive little application called "After Effects v.3".
Now it took a bit of doing, to be sure. I started playing with AE and made some rudimentary titles. Pretty soon, I "got" it... it was like Photoshop, but stuff moved. In no time at all, I found myself starting to obsess about it. I'd stay until the wee hours of the morning trying out various approaches to visual problems, and digging deeper and deeper into the software. There weren't any 'reels' on the internet at the time, so I went to design book stores and tried to duplicate (and move) the imagery. Motion graphics became, to me, the perfect application of my visuality: the (somewhat) immediate feedback (akin to photography), the temporal benefits of film (and the visual benefits, with the introduction of 3d space in AE5) and the flexibility of working with large or small (or no) groups of people.
And that brings us to the gist of it... how do you 'learn' motion graphics anyway? Speaking personally, I would not recommend courses in animation and compositing. You'd probably be attending a private school and laying out huge amounts of cash to do what I feel you can just as easily accomplish at home with a couple of books and a burning obsession to learn as much as possible. Get the technical training vids from totaltraining. Get the Meyers' books. Visit The Anvel. Mark Christensen's books. Download John Dickinson's tutorials. Join and ask stupid questions at the Toolfarm forum, the COW, and sign up for the Media-motion After Effects list. Download reels from the internet and try to duplicate them: don't worry if you can't get it just so, let fate turn you in other directions. In fact, if you DO copy something exactly, then I believe you've failed. And there's the issue of serendipity: look for- and perhaps you'll get- a gig working for little (or nothing) at an established design firm. Jump to it (and remember you're saving yourself $30,000 by not going to a 'design' school. 'Spend' it instead by working for cheap at a great design house. Just don't be taken advantage of.) And then there's the issue of school. Hey, wait a second... didn't I just say don't go to school? Yes, but look closer and you'll see that I said "don't go to a private animation and design school". Do consider going through a program (or taking courses) in traditional art and design. Think art history, painting, sculpture and the likes. Nothing to do with motion graphics, you figure? You'll find that that's so very not the case. Take photography courses (with chemicals if you can find it... digital photography is just hi-def video at one frame every now and again, in my opinion :) Make sand castles. Look up, and down. Tape things to sign posts. Read. Surf. Do what you need to establish your visuality. A very good way to learn is to help others. I like to say that motion graphics is like architecture: so many disciplines wrapped up into one complex package. It's technical, it's artistic, it's easy to "do" but so very hard to do well.
So. Did you skip the 'verbose' back story and jump down here to the bottom to 'get to the goods'? If you didn't, then you must be pretty jazzed on motion graphics to wade through that lengthy tome. But if you jumped right to this paragraph to get "the answer", then I might question whether this gig is truly for you. Not because I'm some sort of motion graphics demi-god or anything and you should do what I say or else fail, but because I strongly believe that a bold and complete dedication to your motion graphics career (both technically and artistically) is necessary if you're going to really 'make it'.
Like anything, really.

Sunday, June 18, 2006
Chromatica
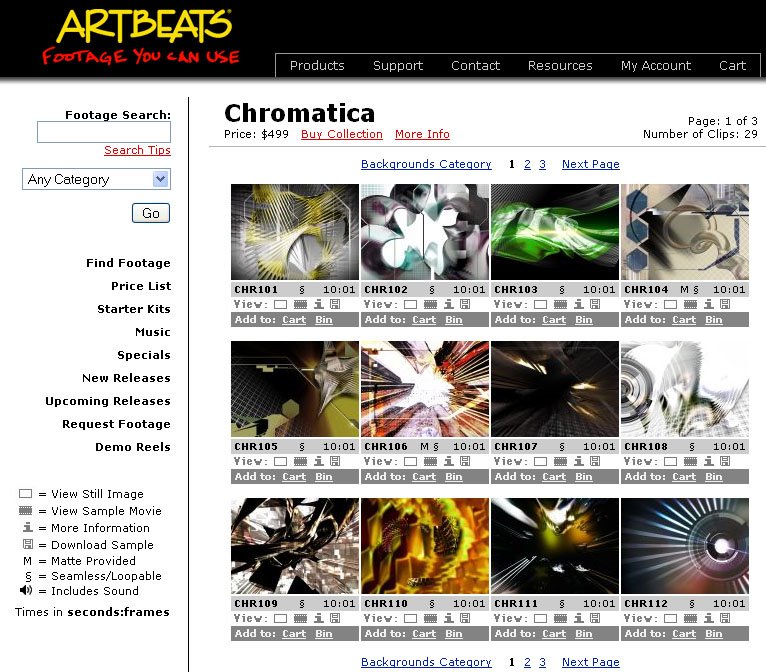
Bear with me for a second here as I pitch some commercial imagery...
A couple of months ago, Artbeats released a new package of backgrounds called "Chromatica" (standard and hi-def) that was designed by this really super, uber-talented artist named... Me! I designed the package because I found that I often had editorial imagery that I had to support with some aggressive backgrounds. The soft, flowing fuzzy stuff doesn't always cut it!
I used a lot of 3d in the imagery, mostly metallic chromy-y 3d gak and the likes, with some strong use of grids and lines and such. Not much news there, really: you can find this stuff if you look hard enough. But I included a couple of things with the package that give you a lot more flexibility when it comes down to using it in projects.
First, you'll discover that there are a lot of black and white looping matte clips that echo the visual impact of the backgrounds themselves. If you know a thing or two about either editing or visual compositing, this means that you can use the mattes to 'cut out' things to composite over the backgrounds (or vice versa).
The second thing that comes with the Chromatica package (just the Standard Definition package... but see the tip below) is a clever little After Effects project (v 6.5 or later) called "Blender". Basically, you open the project and through the tricky (and to you, invisible) use of expressions, you use After Effects as an graphical user interface to create thousands and thousands of different backgrounds. It's simple: you click and drag to select foreground and background imagery, do the same to choose a matte cutout, select your render composition (D1, DV, PAL and others) and render. It's super intuitive, and you don't need to know a THING about After Effects to make the changes! In fact, I'd say that it's downright fun (in a geeky sort of way) to play with: click, drag, see changes. It's pretty addictive.
As the Quicktime will show you, it works super well with the Adobe Video suite (available only on PC thus far) when you use the Blender AE project as an Adobe Live Link in Premiere Pro. You can make changes really fast with clients looking over your shoulders and update your GFX in real time.
And here's a tip if you purchase Chromatica: you can use Blender with any and all of your existing background (or other) footage by doing a 'replace footage' of the Blender footage items, thus extending the 'life' of your backgrounds library. One other tip: Blender "comes only with the Standard Definition Chromatica Package", but the good folks at Artbeats told me that if folks say "I want the Blender project", they'll include it with the Hi-Def versions of Chromatica as well.
Subscribe to:
Posts (Atom)

